
Instructions on the use of the AODN's MEST (Metadata Entry and Search Tool)
Version 1.0 last updated 06 August 2008
For a printer friendly version click here
1. Introductory note:
2. Searching for metadata
2.1 Simple local search
2.2 Advanced local search
2.3 Remote Search
2.4 Tips for searching
3. Viewing search results and metadata - Complete, Advanced and XML view
4. Obtaining a username and password
5. Creating a new metadata record from a template.
5.1 Select template and usergroup
5.2 Basic layout of a metadata record
5.3 Help
5.4 Naming your metadata record
5.5 Hints on Important fields
5.6 Repeating fields or elements
5.7 Suppressing and un-suppressing fields or elements
5.8 Adding thumbnail images to a metadata record
6. Creating a new metadata record by inserting XML.
7. Copyright statement
7.1 What is copyright?
7.2 Identifying owners of copyright.
7.3 Do I need to provide a statement about copyright ownership?
7.4 Copyright licensing
7.5 How to add a Creative Commons licence to your metadata record.
8. Validating your metadata record
9. Saving a metadata record and submitting it to BlueNet
9.1 Altering access privileges so that other people can view your record
9.2 Indicating that a resource has been uploaded
9.3 Notify your BlueNet Data Facilitator
10. Updating metadata records
11. Deleting metadata records
12. References
1. Introductory note:
The MEST offers a range of functions including:
- A searchable catalogue of metadata records describing both geospatial and non-geospatial data and other resources.
- Capacity to search for, edit and publish metadata records (conforming to several metadata standards), on the local MEST catalogue;
- Capacity to place permissions over records so that they aren’t available to the public until ready.
- Data files and related ancillary information (including documents) can be directly uploaded, downloaded from metadata records;
- Capacity to search for records on remote catalogues;
- Links within local metadata records that will display mapped data;
- A web-mapping tool which allows you to view mapped data from a range of remote servers.
This guide focuses on the searching for, creating/editing and file upload/download aspects of the MEST.
Thank you for your interest in the MEST. I hope you find these instructions helpful and easy to follow. If you have further questions or feedback, please feel free to contact your university’s Data Facilitator or the BlueNet project office (info@bluenet.org.au ).
Throughout these instructions there are references to the BlueNet Data Facilitators operating at some Australian universities. If your university does not have a BlueNet Data Facilitator or you do not know who they are, please contact BlueNet via the above email address for assistance.
2. Searching for metadata
2.1 Simple local search
The Simple Search option allows you to do a free text search for words occurring anywhere in a metadata record.
2.2 Advanced local search
The Advanced Search tool allows you to be more specific in your search. You can customise your search by using the Title, Abstract, Location or Keyword fields.
From the home page click on ‘Show Advanced Search Options’ which is located above the red search tab on the right hand side of the page. You can then enter text into one or more of the available fields.
You can search for certain data types by choosing an option from the category list, or by selecting either Digital or Hard Copy maps. If you do not check a box all maps will be searched. Note that there will be very few hardcopy maps in this system since the AODN’s primary interest is the dissemination of digital resources.
Regulate the number of Hits per Page by using the drop down menu.
Please note that this section of the MEST is currently under development, some of the search options under this heading are not yet functional.
2.3 Remote Search
The Remote Search tool allows you to search other Australian metadata database servers simultaneously. A Remote Search will provide you with a list of relevant metadata records from within the server or servers that you have chosen, and will show the title of the record and a section of the abstract. Full metadata records can be accessed from the search results.
From the home page click on ‘Show Remote Search Options’ which is located above the red search tab on the right hand side of the page. In the Free Text box, type your search terms and use the Server menu to choose the desired server/s. For multiple selections, hold down the control key (Ctrl) and click on your selections. Note that the Remote Search option can only find records that have been made publicly available; this is also true for any AODN records. Records that are available to you via a local search of the MEST and not to the general public will not be identified in a Remote Search. You can choose either an Advanced or Simple Remote Search by selecting the appropriate buttons on the MEST’s home page.
It is recommended that you choose the maximum of 30 seconds for the Timeout selection. You can regulate the number of Hits per Page by using the drop down menu.
A Remote Search will provide you with a list of relevant metadata records from within the servers you have chosen; showing the title and a section of the abstract. Click either on the record title or …more… to see the complete record. If you have chosen not to display the record in the original version there is a link at the top of the record you can use to access this information.
You can choose to view the metadata records in either the format of the AODN MEST or the format of the original record. Many records containing images may not be visible if the record is viewed in the AODN MEST format. To view all records in their original format choose the Display remote HTML box.
To return to a Local Search of the MEST select the Local Search button the MEST’s home page.
Please note that the format of data records that are found by a remote search are not necessarily ISO compliant.
2.4 Tips for searching
How you search will depend on the number of likely hits for your search topic, but there are a few more general tips worth noting.
- Avoid being too specific in your search, start with more general search terms before narrowing your search with very specific terms, e.g. if you are looking for data on coral spawning, start by typing in ‘coral’ to determine the extent of coral data available.
- Boolean operators (e.g. ‘AND’, ‘OR’, ‘NOT’) cannot be used to search the MEST.
- A wildcard symbol (*) can be used to truncate terms and expand a search.
- Related records can be linked via two mechanisms:
- Parent Identifiers: A record is identified as a parent record if its unique File Identifier is listed in the Parent Identifier field of any other record. You can find child records by conducting a search by the File Identifier of the parent record (using the Free text search option). Usually the first 5-6 characters of the File Identifier, truncated with a ‘*’, is sufficient to find your record (e.g. ‘2b4cfcf0*’ )
- Aggregations: Related records can be linked by a common generic title in the Aggregation Information section of each record. You can find these records by conducting a free text search by the title of the aggregation.
3. Viewing search results and metadata - Complete, Advanced and XML view
Once you have identified a metadata record you can view the record by clicking on its title in the search results screen or by clicking the Metadata button. There are three viewing options available.
- Complete View – Displays the entire metadata record. This view is useful when searching using a browser’s Find option (ctrl F), or for printing. Note if you would like to print a metadata record, we recommend that you first alter your browser print format from profile to landscape.
- Advanced View – Breaks a metadata record up into its major parts;
- Metadata – Information about the metadata record itself, e.g. the File Identifier, when it was created and who the contact is for questions about the metadata record.
- Identification (Data Identification)–Basic information about the resource, e.g. who created it, the title, abstract and keywords.
- Maintenance – Information about the frequency of planned updates for the resource.
- Constraints – Limitations on the access and use of the resource.
- Spatial Info. (Spatial Information) – Information about the geographic, vertical and temporal extent covered by the resource.
- Spat. Repr. (Spatial Representation) – Information about how spatial data is represented (Spatial/GIS data only).
- Ref. System (Reference System) – Information about the reference system used to generate spatial data. (Spatial/GIS data only).
- Distribution – Information on how to obtain the resource. In many cases the resource can be downloaded directly from the MEST via a link in this section. You may need to apply for a username and password to download data (see Section 4).
- Data Quality– Information that helps the user decide on the quality of the resource described, e.g. sampling protocols, calibration information, equipment model information, degree of accuracy, details of any QA/QC procedures.
- Ext. Info. (Metadata Extension Information) – Information on how the metadata standard used in the MEST (The Marine Community Profile) relates to its parent standard, ISO19115. This information is required to ensure interoperability with other metadata profiles also based on ISO19115.
- XML view–This view is for those users familiar with the encoding language, XML (Extensible Markup Language). XML can be used to import and export records into the MEST. The view also allows metadata editors to paste in sections of XML rather than manually typing information as in the Complete and Advanced views. Care should be taken when editing xml since the validation schema expects field tags to occur in a certain order and the content of tags may be fixed by a codelist.
4. Obtaining a username and password
It is not necessary to apply for a username if you are only interested in searching for metadata records. However, you will need a username and password if you plan to download data or create your own metadata records.
To obtain a username and password, please email your university’s BlueNet Data Facilitator or email info@bluenet.org.au. To find out if your university has a BlueNet Data Facilitator please visit www.bluenet.org.au. If you have forgotten your username or password please send an email to info@bluenet.org.au.Once you obtain your password you can change it by selecting the Administration tab from the MEST home page. The Administration page will have three headings – under the heading Personal Info choose ‘Change password’. You will need to enter your old password, your new password and then confirm your new password again.
5. Creating a new metadata record from a template
Before you start we should warn you that this process can be a quite tricky for the uninitiated. We recommend that you contact your BlueNet Data Facilitator for a tutorial before starting your first metadata record.
5.1 Select template and usergroup
From the MEST home page select the Administration tab. The Administration page will have three headings – under the heading Metadata choose New Metadata.
In the Metadata Creation view there are two drop-down menus, Template and Group. Choose an appropriate template. Under the Group drop-down menu choose the appropriate working group that you are associated with and click on Create. Most people will only be a member of a single usergroup.
If you are using the MEST for the first time, we recommend that you choose the BlueNet MCP Template with Examples. This template contains information that demonstrates the required format for fields that require specific formatting, e.g. phone numbers and individual names. If using this template please ensure that you delete any irrelevant fields or content before notifying BlueNet that the record is ready for release.
5.2 Basic layout of a metadata record
On the left hand side of the screen you will see Complete Record and Advanced View. You can choose to open the Complete Record and fill in the sections as you scroll down the page or you can choose Advanced View which will display each section of the metadata separately. The sections of the Advanced View are described in section 3.2 above.
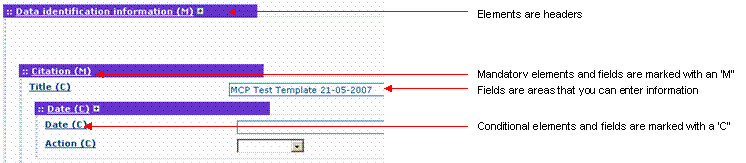
The metadata record itself is made up of Elements and Fields. Elements are headers for particular sections of the record, and Fields are areas that you can enter information into. Most fields in a metadata record are entirely optional; however, there are a few Mandatory fields, and fields identified as being Conditional. Conditional fields are optional fields that become mandatory under certain conditions. You will need to observe these obligations in order to complete a valid metadata record.
Mandatory fields are marked with an ‘M’ – these fields must be completed.
Conditional fields are marked with a ‘C’ – these fields become mandatory under certain conditions.
To obtain a description of the obligation for any Mandatory or Conditional fields simply click on the field name to access the MEST’s Help information. Details of the obligations associated with each field are printed in red.
5.3 Help
Help information can be obtained for any field in the metadata record that is underlined. Click on the field name and the information for that field will appear in a new window. To obtain the help information for all fields, choose the ‘Complete help’ button within this new window.
5.4 Naming your metadata record
The name of the metadata record is recorded in the Title field under Data Identification\Citation. The Title should be a brief, descriptive title of the resource. Things to avoid are:
- The use of the term Template – which is used to identify Template records in the MEST.
- Using the same title for different metadata records.
5.5 Hints on Important fields
5.5.1 Entering contact details
There are number of places within a metadata record that require you to enter your contact details. It is designed this way to accommodate organisations that create data and have a number of different people administer it (e.g. technical contact, principal researcher, point of contact, metadata creator). For the average user who fills all of these roles, this can be a little frustrating. We recommend that you supply your complete contact details in the Point of Contact section and just fill out the basics in all other sections (Name, Organisation, Role). Note your role will not change through out the metadata record, if you are the principle investigator, you should be identified as this throughout the record.
Some organisations prefer not to release some forms of contact detail to the general public (e.g. phone numbers), before entering your contact details, you should check with your organisation.
5.5.2 Abstract
The Abstract is a brief narrative summary of the content of the resource(s). The abstract should be written so that it is understood by as wide an audience as possible, the author should avoid jargon and use concise language. The abstract should include:
- What information was collected (e.g. variables measured)
- How it was collected (equipment used, methodology)
- Brief statement about the location and/or temporal extent.
- Other brief statements that help make the abstract ‘stand-alone’, i.e. the user should be able to determine whether the data will be useful to them by reading the Abstract alone.
5.5.3 Extent
The extent section of a metadata record is used to document geographic, temporal and/or vertical extent of a resource. This section is not mandatory; however, you must complete one of the extent elements if the record describes a dataset (the signifier that a record describes a data set is that the “Hierarchy level” field content is set to “dataset”).
- Geographic element – You have the option of entering a Bounding Polygon, Bounding Box and/or Geographic Description. The easiest and most commonly used option is the bounding box. For the bounding box, you can manually enter your most northern, southern, eastern and western coordinates, or choose a location in the adjacent drop-down menu.
- Temporal Element – Enter a begin-date and end-date and, if necessary, time.
- Vertical Element – Enter a minimum and maximum value and for the VerticalCRS enter the units of measurement (preferably metres).
5.5.4 Data quality information
The Data Quality section is used to describe a number of aspects about the resource such as, collection hardware, methodology, precision and resolution. You can describe all of these aspects in a single occurrence of Data Quality Information or multiple occurrences. The aspect of the resource that you are describing is indicated by the Scope level (a drop-down menu) and then the actual statement is presented in the next element called the Lineage Statement. If you would like to describe the resource with a single instance of Data Quality information, select either ‘dataset’ or ‘nonGeographicDataset’ as the Scope Level.
How you use this section will largely depend on the type of resource you are describing. For experimental data we recommend that you have at least two occurrences of this element: the first to describe the collection hardware and the second to describe the dataset more generally. Metadata enthusiasts might prefer to create a separate metadata record to describe the collection hardware (e.g. a current meter, Argo float or acoustic tag and receiver); in this circumstance the metadata creator need only link the related records, with a Parent Identifier or by forming an aggregation.
The ANZLIC standard for metadata has a good serving suggestion for the order of statements used to describe data quality. Users could use this to help them structure their Lineage Statement.1. Source
a. Description of source data
b. Scale of source data
c. media types
d. date
e. dates of various parts of the process
2. Processing Steps
a. Intermediate processing steps (after data capture)
b. Methods used to generate final product.Could also use ‘Not Known’, ‘Not Documented’ or ‘Not Relevant’.
5.6 Repeating fields or elements
Some elements and fields in the MEST can occur more than once, for example you may want to list several citation authors. To create additional occurrences of a particular field or element, click on the adjacent plus symbol.

5.7 Suppressing and un-suppressing fields or elements
Non mandatory fields can be suppressed from view to simplify the look of your metadata records. This can be done by clicking on the cross located next to the field you would like to suppress. To un-suppress a field, select the plus symbol.
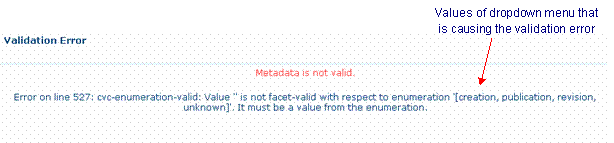
![]()
One current problem with the MEST is that un-suppressed fields containing drop-down menus that have not been used (those containing null values) cause the validation process to trip up. If this occurs the error message after validating will contain the values within the dropdown menu (see example below), to fix this remove the field by clicking on its cross. If you cannot workout which field is causing a problem with the validation, please contact BlueNet. We hope to find a fix for this problem soon.
5.8 Adding thumbnail images to a metadata record
You can upload a large and small Thumbnail image to illustrate the content of your research (the large thumbnail is obtained by clicking on the small thumbnail).
To create an image to illustrate the content of your record data (e.g. a map or photo) click on the Thumbnails button in the Record Edit view. This will take you to the Thumbnail management view.
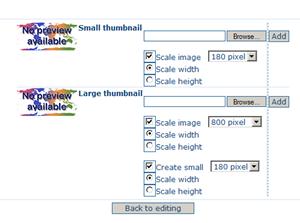
To create the same image for the small and large thumbnails click on the Browse button for the large thumbnail (to locate your image file). Click on the Add button to load both images simultaneously onto your record.
To create different images, select the Browse button in the small thumbprint (to locate an image) and select Add. Then select the Browse button in the large thumbprint to choose a different image. Make sure the Create small box is not ticked and then click Add.
Use the Back to editing button to return to the record view. To preview the large image, click on the small image.
To make changes return to the thumbnail management view and click on both of the Delete buttons to reset the images.
The default settings have been set at a general optimal size but it is important to ensure that the thumbnails are scaled to display your image/s to their best effect and clarity. The size of the thumbnails can be scaled up or down by changing the pixel size. Images can be scaled either vertically or horizontally to a fixed number of pixels – note: please make sure that image proportions are maintained.
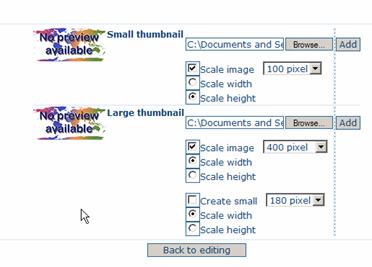
Above is an example of how the settings can be adjusted to load two different images. In the above example the small thumbnail is scaled to a height of 100 pixels and the large thumbnail is scaled to a width of 400 pixels.
5.9 Uploading data or providing a link to a resource.
You can either upload data directly in to the MEST or provide a URL to link to the data stored in another location. This is done by completing information in the Distribution Information section of the MEST. Firstly, enter your name and contact details under Distributor.
Uploading data
- Enter the format details (name and version) of the data file to be uploaded under Distributor format.
- Under Transfer Options click on the plus symbol for Protocol and select “File for download”
- Click on the plus symbol for orName.
- Browse for the file you would like to upload and the click the Upload button. If you experience any problems with this process the first step will be to try simplifying the file name itself, there are a few characters that the MEST does not accept.
At this early stage of development we ask that you do not upload large data files (>50 Mb) instead please contact BlueNet for an alternative storage solution.
Linking to a URL
- Type the address in the URL field.
- Under Transfer Options click on the plus symbol for Protocol and select “Web address (URL)”.
- When creating external links to the MEST we ask that do your best to ensure that:
- The resource is freely available from this link.
- The URL does not contain or link to any offensive material.
6. Creating a new metadata record by inserting XML
If you have an XML version of your metadata that is ISO 19115 compliant and you wish to import it into the MEST, simply follow the below directions.
- From the MEST home page select the Administration tab. The Administration page will have three headings – under the heading Metadata choose XML Metadata Insert.
- Click in the Metadata window and paste your XML into the area.
- Select the group that you belong to and then select the appropriate XML schema (usually ‘iso19115 –MCP’ or ‘iso19115’)
- Click the Validate check-box and click the ‘Insert’ button.
7. Copyright statement
Unless otherwise indicated the below information is a summary of information written for BlueNet by Fitzgerald et al. (2007). Please note that that the below information should not be used as a substitute for legal advice, we strongly encourage all organisations associated with the AODN to seek their own legal advice before submitting any resources. Further detail about copyright and copyright licencing can be found at http://www.bluenet.org.au.
7.1 What is copyright?
Copyright is a set of rights that attaches to an original work when it is created. Copyright is a type of Intellectual Property Right, it covers data, databases, written materials, photographs, videos and sound recordings (Commonwealth of Australia 2007).These rights permit the owner of copyright to control the doing of certain acts in relation to their material (such as making copies of it) and to prevent others from using the material without permission. Copyright is a property right which can be owned by individuals, organisations and governments. It can be dealt with in the same ways as other forms of property, e.g. by selling or licensing.
7.2 Identifying owners of copyright.
Before any resource is uploaded to the MEST, you should ensure that all owners of copyright agree to both allowing the work to be reproduced and communicated to the public. If you do not know who owns the copyright of the data please contact your Research Office or BlueNet for advice.
7.3 Do I need to provide a statement about copyright ownership?
In Australia, the copyright act protects work from the moment it is first written down, painted or drawn, filmed or taped without the need for a specific copyright statement (Commonwealth of Australia 2007). However, this may not be sufficient in other countries, IP Australia recommends that you provide as a minimum a copyright notice with the owners name and date (Commonwealth of Australia 2007). We recommend that you select ‘copyright’ under the Legal Constraints section of your metadata record (for both Access and Use of the data) and use a copyright licence (see below).
7.4 Copyright licensing
By making your resource available you are allowing someone to exercise one or more of the exclusive rights of your copyright ownership. To ensure that you are appropriately attributed as the copyright owner and/or to limit the way the resource is used, you should attach a copyright licence to your metadata record. A licence does not assign (transfer) ownership of copyright to another person, it simply grants a permission to exercise certain rights. There are a number of standard-form licences that can be adopted by organisations or individuals, the most commonly used type for information published on the internet is the Creative Commons licence. Creative Commons licensing is based on the U.S. Copyright Act, it thus functions within the vast majority of legal systems operating across the world. For more information about Creative Commons Licensing visit http://creativecommons.org/, the FAQ page on this site should cover most of your questions (http://wiki.creativecommons.org/Frequently_Asked_Questions ).
The rights given via a Creative Commons licence are the rights to copy, distribute, display and perform the work. A Creative Commons licence can subject these rights to certain conditions, such as:
- Attribution – this applies to every Creative Commons licensed work and means that whenever the work is copied or redistributed the author/creator must be reasonably credited;
- Non-commercial – the work can be used for non-commercial purposes only;
- Non-derivative – only exact copies of the work (not derivative works based on the original work) can be made, displayed and performed; and
- Share-Alike – users may distribute derivative works, but only under a license identical or similar to the one that governs the original work.
These conditions can be used individually or can be combined. The only conditions that are incompatible and therefore cannot feature in the same license are the non-derivative and share-alike options.
7.5 How to add a Creative Commons licence to your metadata record.
For most resources submitted to the AODN, a Creative Commons Attribution licence will be most appropriate copyright licence to use. We recommend that you paste the below statement into the Metadata Constraints section of your record. If you would like to use an alternative Creative Commons licence visit www.bluenet.org.au for more text examples.
“This resource is licenced under a Creative Commons Attribution 2.5 Australia, to view a copy of this licence visit http://creativecommons.org/licenses/by/2.5/au/
The attribution should include the following components of this metadata record; citation author name/s, citation author organisation/s citation title, file identifier and the URL for the MEST- http://bluenet.its.utas.edu.au/geonetwork.
For example - Magierowski, R.H. (2007) Community assembly in marine macrofauna communities. University of Tasmania. Record number 25cdcbf0-2b7e-11dc-aaa4-00188b4c0af8. http://bluenet.its.utas.edu.au/geonetwork/”
8. Validating your metadata record
A record will be valid once all Mandatory fields and Conditional fields have been completed and once all appropriate content is inserted into the constrained fields. Constrained fields are fields that require a certain type of content. There are three types of constrained fields in a MEST metadata record: code lists (drop-down menus) numerical fields and dates. Please note that the MEST will only test whether the metadata confirms to the ISO schema it will not validate the content of fields (e.g. spelling).
In the current stage of development of the MEST the validation button at the top and bottom of your form can only test whether mandatory fields have been completed and whether any constrained fields have valid content. At this point in time the validation procedure does not check to ensure that any Conditional elements that have become Mandatory have been completed. We hope to complete this stage of development soon, until then your university’s Data Facilitator can help to ensure that these fields are completed.
We are also developing the error messages that describe non-valid metadata records, if you receive a message that you do not understand, please contact your Data Facilitator.
Common errors that occur are:
- Mandatory field not completed. Look for fields with an ‘(M)’ that are empty.
- Empty drop down menus. Use the cross button to remove fields with drop-down menus that you haven’t used.
- Unacceptable content in constrained fields. The bounding box, vertical extent and temporal extent fields should contain only numbers. Dates should be in the correct format (YYYY-MM-DD, YYYY_MM or YYYY).
9. Saving a metadata record and submitting it to BlueNet
You do not need to complete a metadata record in one sitting, by selecting the ‘Save and Close’ button, the record is saved but is only visible to yourself if you are the only member of your user-group, and BlueNet staff. If you share your user-group with other people they will also be able to see your record. When you would like to continue editing your record, simply conduct a search for the record and select the ‘Edit’ button.
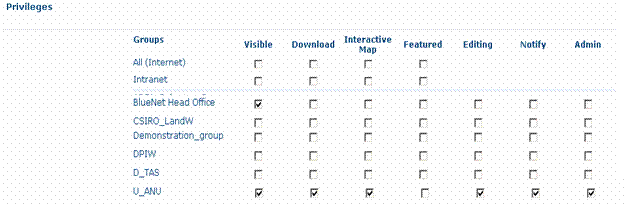
9.1 Altering access privileges so that other people can view your record
Once you have saved and closed a metadata record, you can adjust viewing privileges to allow other users to see the record. To do this select the ‘Privileges’ button. You can adjust viewing rights in a number of ways but the most important thing to remember is that you should not make your record visible to the Internet or Intranet, this should only be done by the BlueNet Project Office after the record has been checked for errors. The Privileges section should only be used to allow other individual users to view or edit your record.
The various options you can give another user are:
- Visible – the other user can see your record but not edit it
- Download – the user can see your record and download any data associated with it
- Interactive Map – The other user can see your record and if a WMS layer is available, use this map layer.
- Featured – The other user will sometime see your record on the home page of the MEST under “Featured Map’.
- Editing – The other user can see and edit your record.
- Notify – The other user will be notified if data is downloaded from your metadata record.
- Admin – The other user has administration rights over your metadata record.
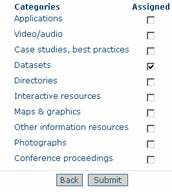
9.2 Indicating that a resource has been uploaded
As a final step you may like to select a category code for your resource, to do this after saving and closing a record select the ‘Categories’ button. Select the option/s that best describes the resource you have uploaded. This step is optional but increases the chances of the data being discovered by another user, as users are able to search by these category types via the home page of the MEST.
9.3 Notify your BlueNet Data Facilitator
Once you have finished editing your record, select the ‘Save and Close’ button and send an email to your BlueNet Data Facilitator. Tell the Facilitator the title of your record and if you have it, it’s File Identifier (unique number towards the bottom of the metadata record). Your Facilitator will check the record for errors and ask the BlueNet Project Office for further quality checks. Once this process is complete the BlueNet Project Office will alter the Privileges section of the metadata record so that it can be viewed by users without a username and password.
10. Updating metadata records
You can update your metadata records at any time, by finding the record via a search and selecting the ‘edit’ button. At this point the Revision Date stamp within the metadata record will change to the current date and time. Once you have completed editing the record, please contact your BlueNet Data Facilitator.
If you need to make changes that apply to all of your metadata records, for example if you change your contact details, please contact your BlueNet Data facilitator. We can conduct bulk changes like these for you.
11. Deleting metadata records
Records can be deleted only after they have been closed, this is achieved simply by selecting the Delete button and then confirming your choice.
Note while editing records you have the option to cancel edits, by selecting the Cancel button. This does not delete the record. Once you have selected the cancel button, you must then follow the directions above to delete it.


12. References
Australian Vice-Chancellors’ committee (AVCC). 2002. Ownership of intellectual property in universities: Policy and good practice guide. AVCC. Canberra.
Fitzgerald, A., K. Pappalardo, A. Austin, and P. Armbruster. 2007. Legal Considerations for Data Management: A guide. Queensland University of Technology.